Webhook Integration Guide
What are Webhooks?
Webhooks are a way for applications to communicate in real-time. Think of them as automatic notifications that are sent to your application when something happens in our platform.
Real-World Example
Imagine you're building an e-commerce app:
- When a customer places an order → You get a webhook notification
- When the order status changes → You get another webhook notification
- When the payment is processed → You get yet another notification
This way, your app stays updated without constantly asking "has anything changed?"
Getting Started
Step 1: Create Your Webhook Endpoint
First, you need a public URL that can receive webhook notifications. Here are some options:
Option A: Use a Cloud Service
- Heroku: Deploy a simple web app
- AWS Lambda: Serverless function
- Google Cloud Functions: Serverless function
- Vercel: Easy deployment platform
Option B: Use a Webhook Testing Service
- webhook.site: Get a temporary URL for testing
- ngrok: Expose your local server to the internet
Option C: Use Your Own Server
- Deploy a web application on your server
- Ensure it's accessible via HTTPS
Step 2: Create a Simple Webhook Handler
Here's a basic example using Node.js and Express:
const express = require('express')
const app = express()

// Parse JSON requests
app.use(express.json())

// Your webhook endpoint
app.post('/webhooks', (req, res) => {
  console.log('Received webhook:', req.body)

  // Process the webhook data here
  const eventType = req.body.type
  const eventData = req.body.data

  // Handle different event types
  switch (eventType) {
    case 'ContactCreate':
      console.log('New contact created:', eventData)
      // Add your logic here
      break
    case 'ContactUpdate':
      console.log('Contact updated:', eventData)
      // Add your logic here
      break
    default:
      console.log('Unknown event type:', eventType)
  }

  // Always respond with 200 OK
  res.status(200).json({ success: true })
})

// Start your server
const PORT = process.env.PORT || 3000
app.listen(PORT, () => {
  console.log(`Webhook server running on port ${PORT}`)
})
Step 3: Test Your Endpoint
Before connecting to our platform, test your endpoint:
curl -X POST https://your-app.com/webhooks \
  -H "Content-Type: application/json" \
  -d '{
    "type": "ContactCreate",
    "timestamp": "2025-01-28T14:35:00.000Z",
    "webhookId": "test-123",
    "data": {
      "firstName": "John",
      "lastName": "Doe",
      "email": "[email protected]"
    }
  }'
Available Webhook Events
We offer a comprehensive set of webhook events that cover all major activities in our platform. Here's a quick overview of the main event categories:
Event Categories
- Contact Events: Contact creation, updates, deletion, and tag changes
- Opportunity Events: Opportunity lifecycle management and status updates
- Task Events: Task creation, completion, and deletion
- Appointment Events: Calendar appointment scheduling and updates
- Invoice Events: Invoice lifecycle from creation to payment
- Product Events: Product catalog management
- Association Events: Relationship management between records
- Location Events: Location creation and updates
- User Events: User account management
- And many more...
Detailed Event Documentation
For complete details about each webhook event, including:
- Exact payload structure for each event
- Field descriptions and data types
- Sample JSON responses
- Event-specific examples
📖 View Complete Webhook Documentation →
This detailed documentation provides comprehensive information about every available webhook event, including exact payload structures, field descriptions, and real-world examples.
Security: Verifying Webhook Authenticity
Why Verification is Important
Webhooks can be spoofed by malicious actors. Always verify that webhooks are coming from our platform.
Signature Headers
We send two signature headers so you can verify the request body:
| Header | Algorithm | Status |
|---|---|---|
X-WH-Signature | RSA-SHA256 | Legacy — will be deprecated; use for backward compatibility only. |
X-GHL-Signature | Ed25519 | Current — use this when present. We will rely only on this header after the legacy one is removed. |
The legacy header X-WH-Signature will be deprecated on July 1, 2026. After that date, webhooks will be signed only with X-GHL-Signature. Please switch your integration to verify X-GHL-Signature (using the GHL Ed25519 public key) before the deprecation date to avoid disruption.
How to Verify
We sign the webhook body with our private key. You verify it using the public keys below.
Legacy (RSA) public key — for X-WH-Signature
-----BEGIN PUBLIC KEY-----
MIICIjANBgkqhkiG9w0BAQEFAAOCAg8AMIICCgKCAgEAokvo/r9tVgcfZ5DysOSC
Frm602qYV0MaAiNnX9O8KxMbiyRKWeL9JpCpVpt4XHIcBOK4u3cLSqJGOLaPuXw6
dO0t6Q/ZVdAV5Phz+ZtzPL16iCGeK9po6D6JHBpbi989mmzMryUnQJezlYJ3DVfB
csedpinheNnyYeFXolrJvcsjDtfAeRx5ByHQmTnSdFUzuAnC9/GepgLT9SM4nCpv
uxmZMxrJt5Rw+VUaQ9B8JSvbMPpez4peKaJPZHBbU3OdeCVx5klVXXZQGNHOs8gF
3kvoV5rTnXV0IknLBXlcKKAQLZcY/Q9rG6Ifi9c+5vqlvHPCUJFT5XUGG5RKgOKU
J062fRtN+rLYZUV+BjafxQauvC8wSWeYja63VSUruvmNj8xkx2zE/Juc+yjLjTXp
IocmaiFeAO6fUtNjDeFVkhf5LNb59vECyrHD2SQIrhgXpO4Q3dVNA5rw576PwTzN
h/AMfHKIjE4xQA1SZuYJmNnmVZLIZBlQAF9Ntd03rfadZ+yDiOXCCs9FkHibELhC
HULgCsnuDJHcrGNd5/Ddm5hxGQ0ASitgHeMZ0kcIOwKDOzOU53lDza6/Y09T7sYJ
PQe7z0cvj7aE4B+Ax1ZoZGPzpJlZtGXCsu9aTEGEnKzmsFqwcSsnw3JB31IGKAyk
T1hhTiaCeIY/OwwwNUY2yvcCAwEAAQ==
-----END PUBLIC KEY-----
Verifying the legacy signature:
const crypto = require('crypto');
const legacyPublicKey = `<paste_legacy_public_key_above>`;

function verifyLegacy(payload, signature, publicKeyPem) {
  if (!signature || signature === 'N/A') return { ok: false, reason: 'no signature' };
  try {
    const verifier = crypto.createVerify('SHA256');
    verifier.update(payload);
    const ok = verifier.verify(publicKeyPem, signature, 'base64');
    return { ok, reason: ok ? null : 'verify failed' };
  } catch (e) {
    return { ok: false, reason: e.message };
  }
}
GHL Signature (Ed25519) public key — for X-GHL-Signature
Use this key to verify the X-GHL-Signature header. Prefer this header when present; the legacy header will be deprecated.
-----BEGIN PUBLIC KEY-----
MCowBQYDK2VwAyEAi2HR1srL4o18O8BRa7gVJY7G7bupbN3H9AwJrHCDiOg=
-----END PUBLIC KEY-----
Verifying the GHL signature:
const crypto = require('crypto');
const ghlPublicKey = `<paste_ghl_public_key_above>`;

function verifyGhl(payload, signature, publicKeyPem) {
  if (!signature || signature === 'N/A') return { ok: false, reason: 'no signature' };
  try {
    const payloadBuffer = Buffer.from(payload, 'utf8');
    const signatureBuffer = Buffer.from(signature, 'base64');
    const ok = crypto.verify(null, payloadBuffer, publicKeyPem, signatureBuffer);
    return { ok, reason: ok ? null : 'verify failed' };
  } catch (e) {
    return { ok: false, reason: e.message };
  }
}
Recommended verification flow: If X-GHL-Signature is present, verify using the Ed25519 public key. If only X-WH-Signature is present (during the transition period), verify using the legacy RSA public key. Reject the request if verification fails.
Setting Up Your Integration
1. Create Your OAuth Application
You'll need to create an OAuth application in our marketplace via the dashboard. This will give you:
- A webhook URL to receive notifications
- Access to specific data based on scopes
- Ability to subscribe to specific events
2. Configure Your Webhook URL
After filling in all the mandatory information, head down to the Auth section under the advanced setting.
Select the scope of you application from the drop down

3. Choose Your Events
After defining the scopes, head to the webhook section under the advanced settings
Turn on and paste your webhook URL against the events you wish to receive a webhook response to

- Scopes can only be changed while your app is in a draft version. Once your app is live, scopes are locked and cannot be modified until a new draft is created.
- Webhook endpoints and subscribed events can be modified at any time, even when your app is in a live version. This allows you to update which events your webhook endpoint receives without requiring a new app draft.
Handling Webhooks Reliably
Best Practices
-
Always Respond Quickly
- Process webhooks asynchronously if needed
- Return 200 OK immediately
- Do heavy processing in the background
-
Handle Duplicates
- Store webhook IDs to prevent duplicate processing
- Make your processing idempotent (safe to run multiple times)
-
Log Everything
- Log all incoming webhooks
- Log processing results
- Log errors for debugging
Example Implementation
This example prefers X-GHL-Signature (Ed25519) when present, falling back to the legacy X-WH-Signature (RSA) during the transition period.
const express = require('express')
const crypto = require('crypto')

const app = express()
app.use(express.json())

// Public keys from the Security section above
const LEGACY_PUBLIC_KEY = `-----BEGIN PUBLIC KEY-----
MIICIjANBgkqhkiG9w0BAQEFAAOCAg8AMIICCgKCAgEAokvo/r9tVgcfZ5DysOSC
Frm602qYV0MaAiNnX9O8KxMbiyRKWeL9JpCpVpt4XHIcBOK4u3cLSqJGOLaPuXw6
dO0t6Q/ZVdAV5Phz+ZtzPL16iCGeK9po6D6JHBpbi989mmzMryUnQJezlYJ3DVfB
csedpinheNnyYeFXolrJvcsjDtfAeRx5ByHQmTnSdFUzuAnC9/GepgLT9SM4nCpv
uxmZMxrJt5Rw+VUaQ9B8JSvbMPpez4peKaJPZHBbU3OdeCVx5klVXXZQGNHOs8gF
3kvoV5rTnXV0IknLBXlcKKAQLZcY/Q9rG6Ifi9c+5vqlvHPCUJFT5XUGG5RKgOKU
J062fRtN+rLYZUV+BjafxQauvC8wSWeYja63VSUruvmNj8xkx2zE/Juc+yjLjTXp
IocmaiFeAO6fUtNjDeFVkhf5LNb59vECyrHD2SQIrhgXpO4Q3dVNA5rw576PwTzN
h/AMfHKIjE4xQA1SZuYJmNnmVZLIZBlQAF9Ntd03rfadZ+yDiOXCCs9FkHibELhC
HULgCsnuDJHcrGNd5/Ddm5hxGQ0ASitgHeMZ0kcIOwKDOzOU53lDza6/Y09T7sYJ
PQe7z0cvj7aE4B+Ax1ZoZGPzpJlZtGXCsu9aTEGEnKzmsFqwcSsnw3JB31IGKAyk
T1hhTiaCeIY/OwwwNUY2yvcCAwEAAQ==
-----END PUBLIC KEY-----`
const GHL_PUBLIC_KEY = `-----BEGIN PUBLIC KEY-----
MCowBQYDK2VwAyEAi2HR1srL4o18O8BRa7gVJY7G7bupbN3H9AwJrHCDiOg=
-----END PUBLIC KEY-----`

function verifyLegacy(payload, signature, publicKeyPem) {
  if (!signature || signature === 'N/A') return { ok: false, reason: 'no signature' }
  try {
    const verifier = crypto.createVerify('SHA256')
    verifier.update(payload)
    const ok = verifier.verify(publicKeyPem, signature, 'base64')
    return { ok, reason: ok ? null : 'verify failed' }
  } catch (e) {
    return { ok: false, reason: e.message }
  }
}

function verifyGhl(payload, signature, publicKeyPem) {
  if (!signature || signature === 'N/A') return { ok: false, reason: 'no signature' }
  try {
    const payloadBuffer = Buffer.from(payload, 'utf8')
    const signatureBuffer = Buffer.from(signature, 'base64')
    const ok = crypto.verify(null, payloadBuffer, publicKeyPem, signatureBuffer)
    return { ok, reason: ok ? null : 'verify failed' }
  } catch (e) {
    return { ok: false, reason: e.message }
  }
}

function verifyWebhookSignature(payload, headers) {
  const ghlSig = headers['x-ghl-signature']
  const legacySig = headers['x-wh-signature']
  if (ghlSig) return verifyGhl(payload, ghlSig, GHL_PUBLIC_KEY)
  if (legacySig) return verifyLegacy(payload, legacySig, LEGACY_PUBLIC_KEY)
  return { ok: false, reason: 'no signature' }
}

// Store processed webhook IDs (use a database in production)
const processedWebhooks = new Set()

app.post('/webhooks', async (req, res) => {
  try {
    const payload = JSON.stringify(req.body)

    // 1. Verify signature (prefer GHL, then legacy)
    const verification = verifyWebhookSignature(payload, req.headers)
    if (!verification.ok) {
      console.error('Invalid signature:', verification.reason)
      return res.status(401).json({ error: 'Invalid signature' })
    }

    // 2. Check for duplicates
    if (processedWebhooks.has(req.body.webhookId)) {
      console.log('Duplicate webhook, skipping:', req.body.webhookId)
      return res.status(200).json({ message: 'Already processed' })
    }

    // 3. Log the webhook
    console.log('Processing webhook:', req.body.type, req.body.webhookId)

    // 4. Process asynchronously (don't block the response)
    setImmediate(() => processWebhookAsync(req.body))

    // 5. Mark as processed
    processedWebhooks.add(req.body.webhookId)

    // 6. Respond immediately
    res.status(200).json({ success: true })
  } catch (error) {
    console.error('Webhook processing error:', error)
    res.status(200).json({ success: false, error: 'Processing failed' })
  }
})

async function processWebhookAsync(webhook) {
  try {
    switch (webhook.type) {
      case 'ContactCreate':
        await handleNewContact(webhook.data)
        break
      case 'ContactUpdate':
        await handleContactUpdate(webhook.data)
        break
      // Add more cases as needed
    }
    console.log('Successfully processed webhook:', webhook.webhookId)
  } catch (error) {
    console.error('Failed to process webhook:', webhook.webhookId, error)
  }
}

async function handleNewContact(data) { /* ... */ }
async function handleContactUpdate(data) { /* ... */ }
Error Handling and Retries
How Our Retry System Works
When a webhook delivery fails, we retry using exponential backoff with random jitter.
- Triggers: any HTTP response that is not a
2xxsuccess. That includes all3xx,4xx, and5xxstatus codes. It also includes cases where we get no HTTP response, such as timeouts or connection failures. - Strategy: exponential backoff + random jitter
- Retries: we retry up to 12 times, excluding the original attempt
Retries stop as soon as we receive any 2xx response.
Manual Retry
If automatic retries have been exhausted or you've fixed an issue on your end and want to redeliver immediately, you can manually retry a failed webhook from the Webhook Logs Dashboard.
- Re-sends the original payload to the same webhook URL
- A failed manual attempt does not start its own automatic retry cycle; scheduled automatic retries for the original failure continue if the manual retry fails
- If the manual retry succeeds, any remaining scheduled automatic retry is cancelled automatically
- Only available for the latest attempt of a webhook that has not already been delivered successfully
See Triggering a Manual Retry for step-by-step instructions.
Understanding Jitter
What is Jitter? Jitter is a random delay added to retry attempts to prevent the "thundering herd" problem. When many webhook deliveries need retries around the same time, without jitter they could all retry at exactly the same time, potentially overwhelming your server.
How it works:
- Our distributed scheduling system applies random jitter to each retry attempt
- The jitter can vary significantly - from seconds to minutes - ensuring natural distribution
- This spreads out the retry attempts, reducing server load and preventing coordinated retry storms
- The jitter ensures that even if many webhooks fail simultaneously, their retries will be distributed over time
What You Should Do
-
Return 200 OK for Success
res.status(200).json({ success: true }) -
Return 200 OK Even for Processing Errors
try {
  await processWebhook(req.body)
  res.status(200).json({ success: true })
} catch (error) {
  console.error('Processing failed:', error)
  // Still return 200 to acknowledge receipt
  res.status(200).json({ success: false, error: 'Processing failed' })
} -
Only Return Error Status Codes for Real Issues
- Any non-
2xxresponse is treated as a failed delivery and retried up to 12 times (excluding the original attempt) using exponential backoff with jitter (see How Our Retry System Works above). - Return
2xxto acknowledge that we reached your server and you accepted the webhook; use the response body to signal app-level success or failure when appropriate (see step 2). - Examples of when you might return an error status:
408(too slow to respond) or5xxwhen the endpoint is unavailable.
- Any non-
-
Use Manual Retry for critical failures
- If automatic retries are exhausted and you've resolved the issue, use the Resend button in the Webhook Logs Dashboard to redeliver immediately.
Webhook URL Health And Circuit Breaker
We periodically review how reliably your webhook URL accepts deliveries. If your endpoint is receiving a high volume of webhooks but failing too often, we notify you first; if the problem persists, we temporarily stop sending webhooks to your app until you fix the issue and turn delivery back on.
How The Check Works
- Schedule and scope: We evaluate each webhook URL about every 3 days, using delivery data from the past 3 days. The rules below apply only if your URL received more than 10,000 webhooks in that same window.
- Metric and threshold: We look at success rate — the share of deliveries that completed successfully (for example, your endpoint returned a successful response as defined by our delivery logic). If that rate is below 90% for the period, the URL is flagged for that check.
First Flag: Warning Email
If your webhook URL is flagged (high volume and success rate under 90%), we send a warning email to the developer contact on the app. Use this as a signal to investigate your endpoint, logs, and the Webhook Logs Dashboard before the next check.
Second Flag: Webhooks Paused
Three days later, we run the check again. If your webhook URL is flagged again — still over 10,000 webhooks in the window and success rate still below 90% — we pause webhook delivery to your app for that URL.
While paused, we do not send new webhooks for the affected configuration until you take action.
Resuming Delivery After A Pause
After webhooks are paused, you must re-enable the events for your app from the marketplace dashboard. Use the same flow as Choose Your Events earlier in this guide. Turning those subscriptions back on restores delivery once your endpoint is ready.
What you should do
- Keep success rates high — follow the guidance in Error Handling and Retries (respond quickly, return appropriate status codes, and avoid unnecessary failures).
- Monitor proactively — use the Webhook Logs Dashboard to spot problems before you receive a warning.
- Act on warning emails — treat them as a final notice before automatic pausing on the next 3-day check.
Testing Your Integration
The best way to verify that your webhook integration is working correctly is to use the Webhook Logs Dashboard. This dashboard provides comprehensive monitoring and troubleshooting capabilities for all webhook deliveries to your application.
Using the Webhook Logs Dashboard
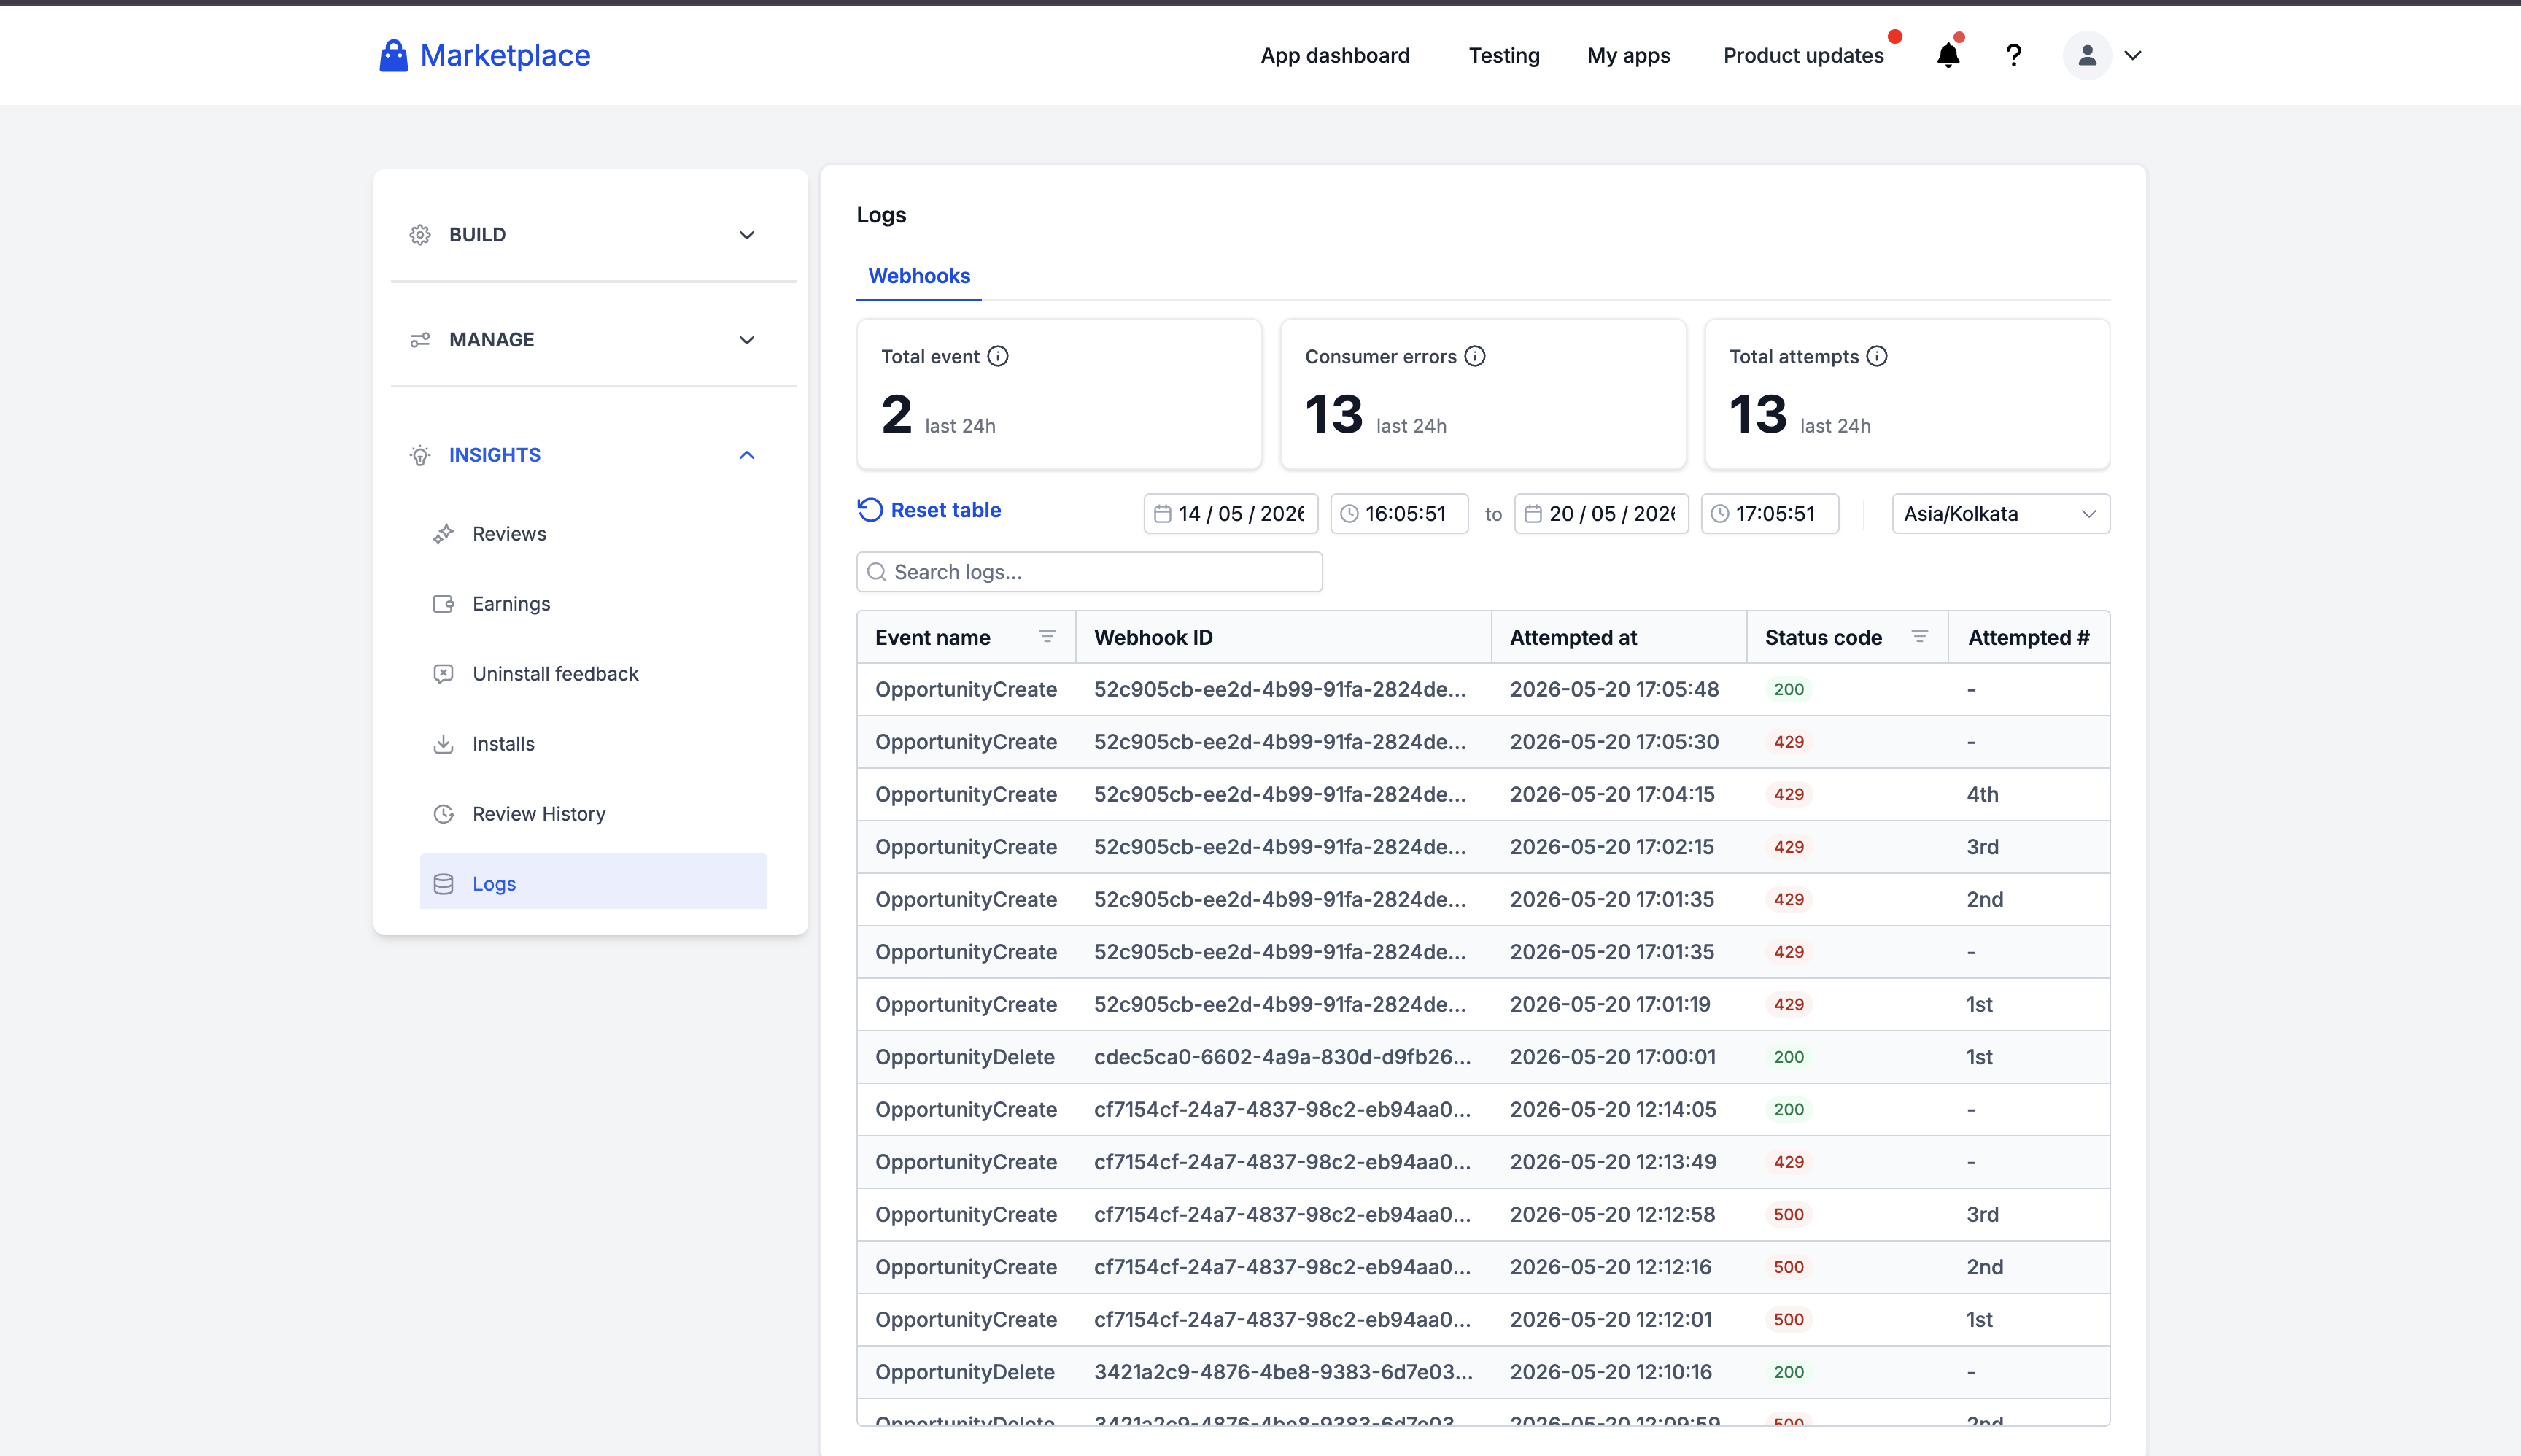
The Webhook Logs Dashboard allows you to:
- View all webhook events sent to your application
- Track success and failure rates
- Search for specific webhook IDs
- Filter by event type and status codes
- View detailed payload information
- Monitor retry attempts
- Investigate delivery issues in real-time
After setting up your webhook endpoint and configuring it in your OAuth application, you can:
- Navigate to your Application Dashboard
- Select the app you want to check logs for
- Go to Insights from the left menu
- Click on Logs
- The Webhooks tab will be active by default
From here, you can monitor all webhook deliveries, check their status codes, view payloads, and troubleshoot any issues.
For detailed information on how to use the Webhook Logs Dashboard, including filtering, searching, and viewing webhook details, please refer to the Webhook Logs Dashboard guide.
Common Issues and Solutions
Issue: "Invalid signature" errors
Solution: Use the correct public key for each header: Ed25519 public key for X-GHL-Signature, RSA public key for X-WH-Signature. Prefer verifying the GHL signature when the header is present.
Issue: Duplicate webhook processing
Solution: Store webhook IDs and check for duplicates before processing.
Issue: Webhooks timing out
Solution: Process webhooks asynchronously and respond quickly.
Issue: Missing webhook events
Solution: Check that you've subscribed to the correct events in your OAuth app.
Issue: Can't access webhook data
Solution: Ensure your OAuth app has the correct scopes for the data you need.
Issue: Webhooks stopped after a warning email
Solution: Your webhook URL may have been paused by the circuit breaker after two consecutive poor health checks. Fix your endpoint and success rate, then re-enable the subscribed webhook events for your app in the marketplace dashboard (OAuth app advanced settings).
Next Steps
- Set up your webhook endpoint using one of the examples above
- Test with webhook.site to make sure it's working
- Create your OAuth application in our marketplace
- Subscribe to the events you need
- Deploy your webhook handler to a production server
- Monitor and log your webhook processing
This guide is designed to help you get started with webhook integration. For advanced features and detailed API documentation, please refer to our complete API reference.